SVG Cowboy card

I took an SVG cowboy boot file and made some Christmas cards out of it for my Country Cousins by welding two boots together (one is flipped) and cut out with my Cricut.

Here is the original SVG Cowboy boot image;

Here are the screen prints showing cut sizes and dimensions on the SCAL cutting mat.
I ungrouped the layers and put each one on a separate SCAL mat page.
Click on each image to enlarge.


Here is a two-tone beige boot I made.

Here is the inside of the boot card with a Xmas tree-shaped insert for writing a message glued down with a Zig 2-way adhesive.


Here is a black and red version of the boot card.


Here is the inside of this boot card with the same tree-shaped insert for writing a message.

The Christmas Tree SVG file (insert for my cards) came from MyCricutScrapbooking.com

Last Minute Christmas Cards

I made a special card for my Mom, because she just loves my hand-made cards, especially at Christmas time.

I used two carts for this card; Christmas Solutions (aka Noël) and Joys of the Season. I cut a Fireplace and a wreath from Joy of the Season cart, and I cut the red Ribbon Garland and the layered green Christmas Tree from the Christmas Solutions (Noël) cart.


I started with a pre-printed card from the DCWV Winter Box of Cards Holiday Collection.


I assembled it all together on a shimmery green piece of cardstock from DCWV Metallic Stack.

I cut green cardstock (shown here is a sample template using yellow) to the dimensions of the card and cut two slots in the back to make the Fireplace pop-up.


Here is the template I used to position the slots.


Here is how it should look (side view).


I embossed the front of the card with my Cuttlebug and a folder from the Winter Collection.


Here is what the front of the card looks like with the embossing.


Here is the finished product assembled together.
I used the Joys of the Season Cricut Cartridge for the cut-outs.
You'll notice I cut two fireplaces and stacked one on the other with pop-dots.
I also cut four separate fire logs; one in yellow, orange, brown; and gray for the grill, stacked accordingly. I added rhinestones where appropriate for some added bling! I also stamped "Merry Christmas" from an Inkadinkado set on the background with embossing adhesive and fine green glitter.

And, as always, I add my trademark logo/signature on the back of each card.
This printing was created with Gel Pens in my Cricut and using my SCAL (Sure Cuts A Lot) application.

Joys of the Season Cricut cartridge used for this project.
Joys of the Season sample sheet of shapes.


Cricut Solutions Christmas Noël cartridge

Christmas Noël sample sheet


I hope you enjoyed my card, and that it inspires you to create your own.

SCAL Christmas card

Here is a nice card made with some SVG files I found on the internet.
Since I've upgraded to Version 2.0 I've been able to upload more files and even make my own with Inkscape. However, this one is just a simple Arched Window file I found on a Scrapbook blog "Images by Heather M" who has some great SVG files; the rest was my ingenuity.

I started with a blank light blue card from a box of DCWV solid textured cards purchased at JoAnn's Craft stores.

Next, I cut an arched window using the SVG file in shadow.

Next, I cut two regular arched windows (one for outside and one for the inside).


Here is the inside left view with the second window cutout attached.
Here is the outside view with the window cutout attached.

I printed out a winter scene I found on the internet and cut it into an arched shape, and glued it positioned so that it can be viewed through the window.

Here is the inside of the card with two snowflakes stamped with embossing ink and glittered with some blue glitter from the "a la mode" fine glitter set by Hampton Arts. The snowflake stamp is on Inkadinkado's stamp set #99599; or use any snowflake stamp.

I also added a Winter Snowflake cutout from an SVG file on DCWV light blue glitter cardstock. There are 3 snowflakes on this SVG file, and I used the top one as shown here.
With SCAL2, you can ungroup the snowflakes and use only one at a time.

Here is the finished front with a Snowflake added in the corner.
All I have to do now, is send it to someone!
Thanks for visiting my Craft Blog, and I hope it inspires you to create your own.

Supplies used for this card:
Arched window SVG file
Snowflake Stamp (Set #99599)
DCWV boxed cards
Winter Snowflake SVG file
Vintage Winter Scenes
All items fastened with the Glue Arts Glue Glider Pro gun available from any craft supply vendor. I originally purchased mine in 2009 from OhMyCrafts.com as a bundle deal with 4 refills. I get my refills from A2Zscrapbookingsupplies.com in multiples of 10 for $55.00

Sure Cuts A Lot projects

I've been playing around with my SCAL software and creating not only cards, but elaborate letterheads for my stationery needs.


Here is a thank you card using one of the many Free SVG files from SCAL's blog.
You can get this free file here: Thank You Cut


I use SCAL to create my logo for my cards, just like Hallmark, including my email.


If you have a Gel Pen holder and Gel Pens, you can draw anything with your Cricut!
As you can see here, I have placed my card open on my Cricut mat and printed on the back side of the card.


I used a corner flourish font called "CornPop" and the Adine Kirnberg Script font to make this letterhead. These fonts are available Free from Fontspace.com


Here is the finished product.

A Cherry On Top

Thank you, ACherryOnTop for my FB freebies @ the 4800 Fan mark! I love them all!
Especially the ♥BoBunny♥ chipboard die cuts. Weeeeeeeeeeee!


I was randomly selected as a winner on Friday, November 5th, from A Cherry on Top, just by liking their fan page on Facebook.

Here is the post I found on the wall of my Facebook page:


A Cherry On Top ‎*4800* fans reached! Woohoo! That's Great! Congratulations to Roxy Miravalle! We hope you enjoy your new goodies from ACOT! Next winner announced soon!

I can't wait to see what I've won! ♥

To join in on the fun, go to their fan page A Cherry On Top and become fan, and you too, may be a lucky winner!

They also have some super deals on their webstore http://www.acherryontop.com/

Happy Crafting!

Thanksgiving Card


Here is my latest creation using the 2010 Thanksgiving (Winter Collection) Cartridge

Turkey Card
I forgot to mention, I coated the turkey with embossing glue and sprinkled brown glitter all over, and the little brown flower was actually made using Walk In My Garden cart. The yellow background for the trukey was a piece of cardstock embossed with my Cuttlebug and the lace trim was cut with the Martha Stewart Eyelet Lace Punch and topped with a mini ribbon with a leaf motif.

Cricut Design Studio Shortcuts


For those of you who use CDS, I'm sure you've been frustrated with the load time of your application each and every time you want to use it.

Well, ladies, here's a handy tip/trick that you can do to cut down your wait time to seconds...That's right, you read that correctly, SECONDS!

First, let me mention, in case you don't already know, that each time you update your version of CDS, it loads more cartridges to your Cricut Fonts Folders. Most are already familiar with the technique of making a copy of the Font Folder and renamed as "Backup Fonts" Folder and only keeping the cartridges that you actually own in the original Fonts Folder. However, if you own lots of carts, it can still delay your load time for the application.

So, here is my variation to that tip/trick with step by step on how to achieve it.
I only load into the Font Folder the carts I'm going to use that day. If I'm making birthday cards, I will only copy the carts I have with a birthday theme. If I'm making Christmas cards, I will only copy my Christmas-themed carts into the appropriate folders. Then, when I done making my creations, I can delete the carts if I wish, because I have the original files in my "Back up Fonts" Folder.
Here's how to get started.

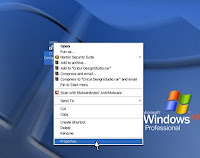
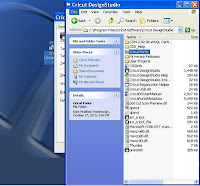
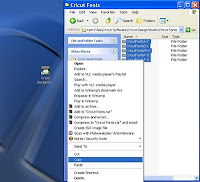
You most likely have a shortcut to your CDS on your desktop. Right click on the icon and select properties as seen above.

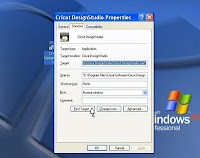
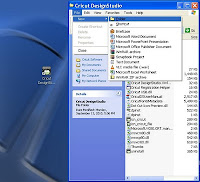
After selecting Properties, a info menu will pop-up. Next, select "Find Target" which will open up the location of your CDS files.

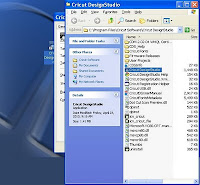
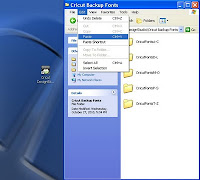
Your folder is now open, showing all the CDS files (the application will automatically be highlighted).

This is the folder you will make a backup copy of and all its contents.

Next step is to create a new Folder, selecting "File" from the menu, then New, then Folder.

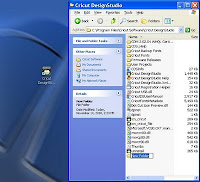
Your new folder is created and automatically highlighted for you to rename it.

While the folder is still highlighted, rename it "'Cricut Backup Fonts"

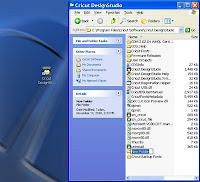
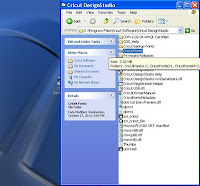
Now, go back to the original Cricut Fonts Folder, open it, and select all folders right click and copy. Now, close this folder.

Go back to your "Cricut Backup Fonts" folder, open it, and paste your files into it.

The last step is to go back to the Original Cricut Fonts Folder and delete the carts from each folder that you don't need, starting with Font folder "FontsA-C" then "FontsD-L" and so on. And, don't worry, you have all these files in your "Backup" folder!

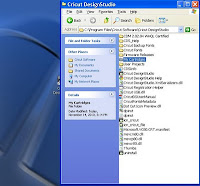
I went one step further and created another folder named "My Cartridges" which I can use to transfer my own carts back and forth without having to go through the original folders which contains a total of 202 files!

And, don't worry about messing it up, because if you do, you can always uninstall and reinstall your CDS if necessary. Here is an updated Design Studio version

Once you've taken the time to do all this, and I know it may take a while at first, you will be rewarded with a quicker load time for your Design Studio.