"Exploding" birthday gift box

I created an Explosion box to hold a gift for a birthday.
This is how the box looks after cutting and decorating.

In order to get your box made, take a 12x12 piece of cardstock (I used a page that had brown shimmery-patterned rectangles) from the DCWV The Natural stack Measure 4" in from each corner and 4" up. Each corner should have a 4" square cut out. Then score and fold your corners upright. This will be your base. See instructions below. 


I used another piece from the same stack to make the top. The top is made using a piece cut at 6 1/4" x 6 1/4" with cut marks 1" in from each corner. It should fit nicely over the box once you cut, score, fold and glue the corners in place. Below is the video that goes over instructions for this box.


I decorated my box with K&Company die cuts with a Birthday theme called "Confetti."


My gift was a store-bought jar of a hair product to which I adhered some home-made labels with a vintage graphic I found on the internet.
The small orange flowers on the box top and the jar were cut from Spellbinders Shapeabilities "Floral Doily Motifs" using the two small inner circles dies.

So there you have your finished product. Imagine the possibilities for other occasions, and how surprised and happy the recipient will be to receive this lovely and thoughtful gift.

Thank you for visiting my blog and I hope it inspires you to create your own wonderful projects.

Category: 2 comments

Spellbinders Christmas ornament

I purchased the 2011 Spellbinders Heirloom Ornament, and started experimenting. This is what I came up with.

Here is the 2011 Heirloom Ornament die from Spellbinders. I cut 5 ornaments using the 3rd inner die and scored them down the middle. I then stamped them with the product mentioned below.


I used the JustRite Christmas Miracle Ornament set from Spellbinders to stamp my die cuts with embossing glue and sprinkled it with red glitter. You'll notice the ornament stamp, and the small insert stamp (which is circled in red) stamps the word "NOEL" which fits in the center of the ornament stamp; however, I stamped it separately with blank ink after glittering.
These are the materials used for making of this ornament; glue pad, stamp pad, score board, gold trim and red glitter from Hampton Art.
This was a very easy project to create, and for next time, I'm going to try the 2nd larger die-cut and use another set of stamps I have from Inkadinkado the Bold Damask set!


Thank you for taking the time to visit and I hope it inspires you to create your own wonderful projects.


Category: 2 comments

All Hallows Eve

I'm late in starting my Halloween cards, but here's a sample of one I made using the Darice embossing folder, "Spider Web."


I used the "debossed" side of a 4 3/8 x 5 3/4" piece of black cardstock to fill in the spider web parts with a white Sakura Glaze pen. While the white glaze ink was still wet, I sprinkled some opaque glitter and shook off the excess.
It's hard to see the results of the opaque glitter in the photo above, and my camera was not cooperating with this close-up shot, either...but you get the idea.
I also used a red Sakura Glaze pen for the spider and in the middle parts of the webs, sprinkled with some fine red glitter (Hampton Art brand).


I then went around the inner border of the frame with some copper-colored Ranger-brand Stickles glitter glue.

These are some of the products used to make this card; Sakura Glaze pens; Stickles glitter glue (copper) and white opaque glitter (a generic brand from Joann's craft store in a 3-pack for $1.00; comes in opaque white, orange and black).

I added a "Happy Halloween" sentiment tag in two parts using the Spellbinders Fancy Tags Two and a clear mini acrylic stamp from the Scrapbookingforless website on sale for 50¢.

I used the bottom die to cut out my sentiment tag. I used two die cut tags; one for the word "HALLOWEEN"and another tag cut off and adhered to the top center with the word "Happy" (as seen in the photo above).

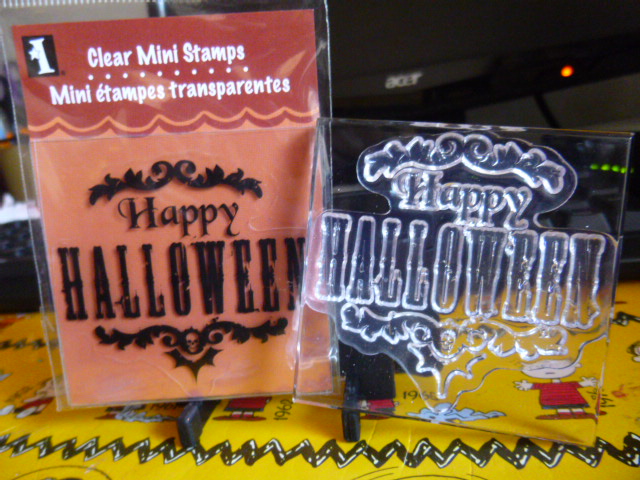
This clear acrylic mini stamp is from Inkadinkado. I blocked off the top and bottom parts with tape so that only the word "Halloween" was clear to stamp with my glue pad. After applying the sticky glue, I removed the tapes to stamp my sentiment.

This is the sticky glue pad I use by Tsukineko for my stamps whenever I dust with glitter which I purchased from Joann craft store.

Here is a close-up view of my two-part stamped and glittered sentiment.

This is the completed portion which I will then adhere to a card. It's a little rough around the edges being I create as I go along, but I'll eventually perfect it now that I've seen it all together. Next time I might use a silver pen for the spider-webbing...who knows?!? That's was creativity is all about! :D


Thank you for taking the time to view my blog and 
I hope it helps inspire you to create your own wonderful cards!

Category: 1 comments

Bride-to-be

My daughter was invited to a Bridal Shower, so I gave her this idea for a card. It's a departure from your normal card for a bride-to-be, but I thought it was a cute idea. I can't take all the credit for the idea though, I saw it on someone's blog as an Anniversary card, and this was my version. I think she did a great job on the card, and it turned out so elegant!
Category: 5 comments

Happy Mother's Day to All!

To all the beautiful ladies out there, I made you a card for Mother's Day, and in it are my wishes for a wonderful day surrounded by those you love and cherish.


Category: 0 comments

Mother's Day 2012


I created a quick Mother's Day card with a few items in my crafting arsenal.


I used a black and cream colored striped card from DCWV's La Crème assortment of cards as my base.


I took a piece of vellum to fit the A2 card (5½" x 4¼") and embossed it with "Grace's Frame" embossing folder. I adhered it to the front of the card with my Zig two way glue pen.


Next I used a piece of cream pearl cardstock from the coordinating DCWV La Crème assortment mat stack.


I used the Cricut cartridge "Fancy Frames" to cut a small 2¼" frame from the cardstock to place on top of the embossed sheet of vellum.


I embossed the frame with a hearts and flowers folder from "Love is in the Air" Cuttlebug bundled set and used pop dots to add on top of the vellum.


Then, I took out my Cricut "Mother's Day 2010" cartridge to cut the phrase and shadow at 3" which was also adhered on top of the embossed frame with pop dots.


I used this scrap of pink paper from a DCWV mat stack to cut the phrase from the Cricut "Mother's Day 2010" cartridge.


The finished product!


Thank you for visiting. I hope you like my card, and I hope it inspires you to make your own wonderful creations.

Category: 0 comments

Sizzix and Cuttlebug!


I received this Sizzix Hello Kitty (Kathy) Die as part of a treasure-trove of prizes as the winner in a monthly drawing from Buy4Less.webstore.com


They are also on Facebook: https://www.facebook.com/shopbuy4less.

Here is the original die on the Sizzix website:

I didn't think I would be able to use this cute little die cut because I don't own a Sizzix Big Shot machine...HOWEVER...my brain got to churning, and I tested it in my Cuttlebug using just two "B" plates (one under and one over) and the paper under the die...


I used some left over scraps from another project to test it out, and low and behold...it worked fantastically!


Now, I'll be looking for more deals on Sizzix dies to use in my Cuttlebug machine!
Can't wait to use my 40-50% coupons at my local craft store to get more of these wonderful die cut templates.


Thank you for allowing me to share and taking the time to look, and I hope it inspires you to make your own wonderful creations! :D

Home-made Rub Ons

I'm sharing a technique, which I used several years ago, and had forgotten all about it until today when I came across the transparency while cleaning out a craft drawer. Transparencies are normally used in the office environment for presentations...I used mine for crafting! :D


This is a photo of a regular transparency sheet which I used to print out some nice pictures I found on the internet. Note, in order for this to work if there are words printed on the graphic, you must print in reverse, same as for t-shirt print settings.


I place the print side down on my paper, and using my score pal embossing tool, I rub the image until it transfers onto the paper.


This is a rough draft of how the transferred image will look. You can now color it in and embellish if you wish. 


I colored my image using gel pens for a glossy look...it's a bit messy, but you get the idea! You can cut it out and place it on a card, or you can transfer and rub directly onto your card stock. 

Thank you for allowing me to share and taking the time to look, and I hope it inspires you to make your own wonderful creations! :D

Category: 0 comments

Cupcake Birthday card

I made a card from a post I saw about a pop-up cupcake birthday card on this blog: http://zakkalife.blogspot.com/


Here is my finished card. I didn't use all the cupcake cutouts as the original card contains. Instead, to add my own personal touch, I embellished it with some spring flowers. I also made an envelope to fit, since it wasn't quite A2 size by using these guidelines: Scorpal envelope tutorial

To download the two-file document for your own card, follow these links.

This is the main card pdf file.

http://www.marieclaireidees.com/data/fichiers/carte%20popup%20planche%202.pdf

This is part 2 pdf file to cut all the pop-up parts.


http://www.marieclaireidees.com/data/fichiers/carte%20popup%20planche%201ok.pdf


Here is a side view (above), and the finished envelope next to my card (below).


If you'd like to follow the video tutorial (it's in French, but you get the main idea by watching), click on this link: Cupcake popup card tutorial (French)

Thank you for allowing me to share and taking the time to look, and I hope it inspires you to make your own wonderful creations! :D

Thank you cards II

My daughter needed to make some thank you cards for her January birthday gifts she received, and came up with these simply-embellished, yet stunning cards.

She took this simple pre-printed Thank you card with silver foil print...
and added a few simple embellishments which made the cards more personalized for the recipient.


Here, she added just a simple ribbon rose, which changed the whole look of the card!


On this card, she added a die-cut package and some corner flourish stickers.


Here she added some girly stickers for that ultra feminine touch.

Thank you for taking a look and hope you enjoyed this post and that it inspires you to to create your own wonderful cards.